Installation Recommendations
THE FOLLOWING GENERAL INSTRUCTIONS ARE PROVIDED AS A CONVENIENCE TO THE INSTALLER, BUT ALL FLOORING SHOULD BE INSTALLED IN ACCORDANCE WITH STANDARDS SET BY THE NATIONAL WOOD FLOORING ASSOCIATION OF THE NATIONAL OAK FLOORING ASSOCIATION.
INSTALLER / OWNER RESPONSIBILITY
It is the responsibility of the installer/owner to make final inspection of the product prior to installation. He must use reasonable selectivity and hold out or cut off pieces with glaring defects, whatever the cause. Five percent (5%) must be added to actual square footage needed as allowance for cutting waste and mismanufacture. Should an individual piece be doubtful as to grade or manufacture the installer should not use the piece of flooring. If he does, Turman Hardwood Flooring’s liability is limited to replacing the defective material above the 5% allowable defect limit (not the labor cost involved).
STORAGE AND HANDLING
Store all flooring in a dry place. Be sure not to deliver until jobsite is fully enclosed and dry. Flooring should not be exposed to high humidity or moisture. Do not truck or unload flooring in rain, snow, or other excessively humid conditions. Cover it with a tarpaulin or vinyl if the atmosphere is foggy or damp. Also protect flooring from excessive heat. When job conditions are correct, deliver flooring and break up into small lots and store in rooms where it will be installed. Allow at least three days for flooring to become acclimated to the jobsite.
TOOLS
You will find the following tools helpful, if not necessary, for proper installation: table saw or circular saw, chalkline, tape measure, hammer, drill with 1/16″ drill bit, nailset, and jamsaw or handsaw. A good quality power nailer in proper working condition will greatly speed installation.
SUBFLOORS
Subfloors should be prepared in accordance with the standards published in great detail by NWFA, of which Turman Hardwood Flooring is a member. In general, the following rules are especially noteworthy. 3/4″ flooring is meant for nail down installation only. It is to have a board (1×4 min.) or plywood (1/2″ min.) subfloor over wooden joists. Do not nail over particle board or similar products. If it is a concrete subfloor, it will be necessary to add an approved wooden nailing surface as described in Association literature prior to installing the floor.
INSTALLATION
Installation should be done in accordance with approved practices as outlined in NWFA publication on 3/4″ nail down installations. In general, the following rules are especially noteworthy:
- Be sure and remove any existing base, shoe, or other moldings which may be present. Under cut any existing door casings as required with jamsaw or handsaw.
- Nail all flooring at right angles to joists.
- Be sure and leave 3/4″ expansion joint around edge of room for seasonal expansion and contraction.
- Be sure and rack the floor so as to space end joints properly so that no two joints are within 6″ of joints on adjoining rows.
- Use proper spacing of nails. Have at least two nails per board. Space nails every 10″ – 12″. Do not place any nails within 4″ of the end of a board. Position as many nails as possible in floor joists.
- Hand nail on top the first two rows of boards after laying your chalkline out from your starting wall. Predrill holes and remember to countersink the 8d and 10d hardened nails you use to nail these rows.
- Be sure to lay first course groove side to starting wall
Warranty Information
The following information and related documents are included with each box of Turman Hardwood Flooring to help insure the best performance of our product. Although job site preparation and installation are solely the responsibility of the contractor/installer or homeowner, we feel it is necessary to mention a few of the most critical issues that could cause or contribute to future problems. It is also necessary for the homeowner to understand the characteristics of solid wood flooring in order to maintain an acceptable environment that will prolong the beauty and soundness of their investment for years to come.
Installer/Contractor/Owner Responsibility
Turman Hardwood Flooring maintains that all flooring products are shipped in good usable condition and should arrive at the job site in the same condition. Therefor all flooring products should be inspected upon delivery and prior to installation for defects, grade, color, proper moisture content and/or any other concerns related to product integrity. Never install any flooring if there is any question as to acceptability. Installation of the flooring constitutes acceptance as received.
It is not the intent of Turman Hardwood Flooring to fully educate anyone as a flooring installer, however as an active member of the National Wood Flooring Association we do have access to information that provides in-depth recommendations as related to the characteristics of wood flooring, job site conditions, moisture control (MC), proper acclimation of hardwood flooring and installation guidelines. We have included a copy of NWFA publication No. A100 for your convenience. Additional information may be obtained from the NWFA at www.NWFA.org.
Waste Factor
When calculating the footage needed for a specific job, it is recommended that 5% be added to the total needed. This should compensate for any material that is deemed unusable for whatever reason. Any piece of flooring that is questionable due to grade, color, milling defects, or damage whatsoever should be laid aside. Do Not Install!. If the amount of unusable flooring were to exceed 5%, Turman Hardwood Flooring shall replace or reimburse the purchaser for the amount of the defective footage above 5%. No adjustments will be made for any flooring that has been installed that had obvious defects prior to installation.
Installation Recommendations
Read the publication from the NWFA that is included on the back side of this page.
Verify the moisture levels in the flooring and the sub floor. Differences of more than 4% either way between the two will result in some changes in the flooring after installation as the floor equalizes. The greater the difference in moisture content, the greater the potential for problems caused from expansion or contraction.
Acceptable sub floors include 5/8″ minimum thickness (CD EXPOSURE 1) plywood, 23/32″ OSB or solid boards 3/4″ thick and not more than 6″ wide. Sub flooring boards should be kiln dried to less than 15% moisture content and nailed at a 45° angle to the floor joist. The sub floor shall be flat, tight, sound, and dry to within 4% moisture content of the flooring to be installed. Particleboard is not recommended as a proper sub floor material.
Hardwood over concrete is acceptable in some applications, but only if the sub floor meets the standards set by the NWFA. Therefore, it is highly recommended that this application be researched thoroughly. Solid hardwood flooring should only be installed in an on or above grade condition. If the soil surrounding the structure is 3″ or more above floor level, solid wood flooring should not be installed. Always put down an approved vapor retardant such as #15 asphalt paper between the sub floors and flooring to be installed. 3/4″ solid wood flooring should be either nailed down or stapled using 1-1/2″ minimum length nails or staples. Minimum two (2) fasteners per piece, 3″ from ends and every 10″ continuous throughout the length of each piece. Insure that the nail gun or stapler being used is fitted with the proper foot or shoe that does not damage the edges of the flooring. End joints should be staggered at least 6″ from those of the previous row. Nail all flooring at right angles (perpendicular) to floor joists. Allow room for expansion (suggested 3/4″) between wood flooring and walls or any other obstructions.
Limited Warranty
Turman Hardwood Flooring hereby warrants, to the original buyer only, that the products are free of manufacturing defects within the five (5%) percent limit and will not wear through the top finish for a period of twenty (20) years after the date of shipment by Turman Hardwood Flooring or any respective distributors thereof.
This Warranty does not cover damage caused in whole or in part by casualty, abuse, wear and tear, cracks, cupping or buckling due to contraction or expansion, or use for which the products are not designed, faulty construction of the building, incorrect installation of the product, settlement of the building walls, failure to adhere to seller specifications and standards set by the National Wood Flooring Association, separation of the concrete slab, excessive moisture from humidity, spillage, migration through the slab, sub floor or walls, color changes or fading in areas where excessive sunlight or where scatter rugs or in place or any other source or acts of God. This Warranty is contingent upon seller’s receipt of notice, in writing, from buyer, of the product defect prior to the expiration of the warranty period, and evidence that products were properly installed and not subject to any of the above mentioned conditions.
This limited warranty does not apply to Appalachian Character Grade, Utility Grade, or any other downgraded or discounted items. All other warranties are hereby disclaimed, expressed or implied. None of the manufacturer’s agents has the authority to add to or change these warranties in any way.
Acclimation
NATIONAL WOOD FLOORING ASSOCIATION TECHNICAL PUBLICATION NO. A100
The point of acclimating wood flooring before installing it is to allow the moisture content of the wood to adjust to “normal living conditions” at the site — that is, the temperature and humidity conditions that will typically be experienced once the structure is occupied.
Thus, it does no good at all — in fact, it is likely harmful, to store wood flooring at the job site under conditions that don’t reflect those normal environmental conditions.
The wood flooring industry has done a good job in recent years communicating the message that wood flooring is a dynamic material subject to changes in dimension as a result of changes in humidity in the surrounding environment. That has led to increasing awareness of the need to acclimate wood flooring before installation. Unfortunately, some installers have heard the message as, “leaving wood flooring at the job site for two weeks will properly acclimate the wood, no matter what the conditions are.”
In trust, some wood flooring may already be at the proper moisture content when it is delivered. To allow it to sit at the job site under excessively humid conditions will only cause the flooring to absorb unwanted moisture.
So, the key message is not that acclimation is good, and that’s all you need to know. Rather, installers need to understand the dynamics of water and wood and make educated judgments about when and how much acclimation is required. To do so requires knowing what the moisture content of the flooring is at the time of delivery and what its expected moisture content will be when “in use.”
Wood at the Jobsite
Before wood is delivered, the jobsite must be checked to determine if it is ready. Wood should not be delivered if jobsite moisture conditions are excessive. Otherwise, one will absorb moisture from the other.
The structure should be fully enclosed, with doors and windows in place, and interior climate controls should be operating for at least 48 hours to stabilize the moisture conditions of the interior. Once at the jobsite, the wood should be set indoors and spread over the subfloor. About four days should pass before installation is started. Moisture contents of both the flooring and the subfloor must be checked and recorded before any work begins.
If flooring is delivered on a damp day or during rain, the boards will absorb moisture. If installed in this condition, the flooring will shrink a few months later and show cracks.
Wood flooring should not be delivered to the jobsite until plastering and painting are completed and dried. Moisture evaporates from damp walls and into the air within the house, and some of it will be absorbed by the flooring.
Another condition that causes flooring to pick up moisture during construction is less obvious, but more common: if the heating or air conditioning is not operating from the time the floor is installed until the house is occupied, the humidity may be higher than it would be if the house were occupied.
Only after getting satisfactory moisture measurements from the concrete slab and the subfloor, and only after wood has acclimatized to the jobsite, is the installer ready to install. When installation is completed, good practice calls for a delay of one or more weeks for further acclimation before beginning the sanding and finishing part of the job.
Troubleshooting
For the Customer:
How to Spot and Avoid Trouble with your Hardwood Floors
In a comfortable home, with slight humidity variations through the seasons, wood flooring responds by expanding and contracting. These changes may be noticeable. During warm, humid weather, wood expands. During dry weather, wood contracts. This seasonal movement is a normal characteristic of wood flooring and it never stops regardless of the age of the wood. One of the best ways to ensure that wood flooring will give the performance homeowners expect is to install humidity controls and ensure that they are functioning before the flooring is installed.
Working with Humidity Controls
A homeowner who chooses hardwood flooring is making an investment in a floor that will last 40 years or more, and he or she should protect that investment by installing humidity controls. Tools that help the floor maintain a beautiful, trouble-free appearance.
Cracks and Separations Between Boards
Nearly every floor endures some separation between boards. In winter, when homes are heated and the air is dry, wood flooring gives up some of its moisture and therefore shrinks. When that happens, thin cracks appear between the boards. This is normal, and homeowners should be forewarned of this. It is acceptable, and customers should not be calling the installers at the first sign of cracks. Once the indoor heat goes off in the spring, and the indoor environment regains moisture, most of these cracks will close up.
Cracks in the winter, in the drier months, may easily develop to the thickness of a dime (1/32″) for solid 2-1/4″ wide strip oak floors. Floors with light stained woods and naturally light woods, like maple, tend to show cracks more than darker, wood-tone finished floors.
The cure for cracks? Homeowners should add moisture to the air during dry periods. It is their choice; live with the cracks and wait until spring, or else add humidity by opening the dishwasher after a rinse cycle, switching off the bathroom fan or hanging laundry to dry in the basement near the furnace. Better yet, install a humidifier in the furnace or an exterior air vent for the furnace burner.
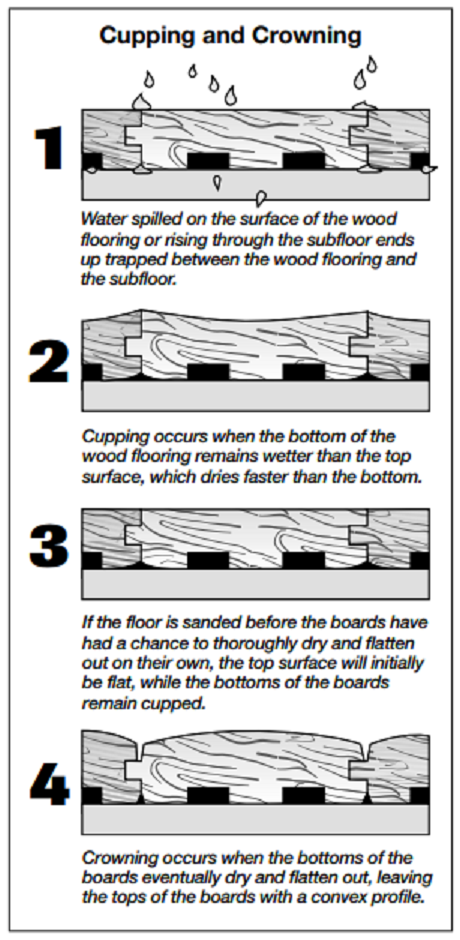
Cupping and Crowning
“Cupping” and “Crowning” are common complaints that develop with high humidity. Both problems occur across the width of the flooring material.
Cupping is when the edges of a board are high and its center is lower. It can occur after water spills onto the floor and is absorbed by the wood, but high humidity is more often the cause. If the wood expands significantly, compression set can result as boards are crushed together, deforming the boards at the edges.
Cupping is caused by a moisture imbalance through the thickness of the wood. The wood is wetter on the bottom of the board than on the top. The moisture imbalance can be proven by taking moisture meter readings at different pin depths.
The first step in repairing a cupped floor is to identify and eliminate the moisture source.
For more information, contact one of our experts.